
Vince The Prince
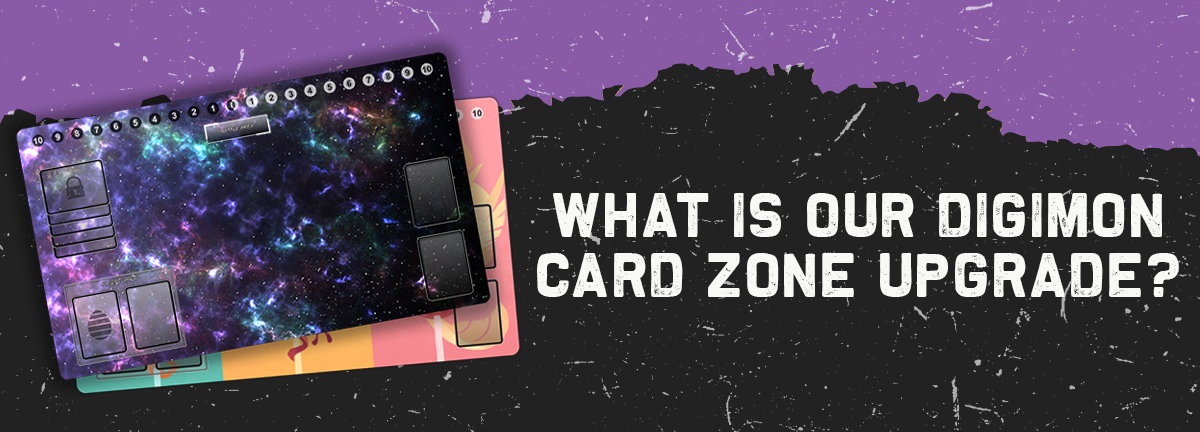
What is our Digimon card zone upgrade?
Wow, it’s been a while since we had one of these! For those of you who need a little refresher (like I did), we had three previous posts that went into a little more detail about some of the other card zone upgrades we offer with our playmats. The upgrades we discussed were for Pokemon, MTG, Dice Masters and Yu-Gi-Oh! Now, we have a total of seven zone upgrades for our playmats, and today we will be covering number five...Digimon!
Our Digimon playmats feature 6 different zones, which are:

As I’ve said in previous posts, these zones are meant to keep your game neat and organized while you play. Each zone has a purpose, which we will briefly highlight in the body below.
Shout out to our gaming guru Ryan for giving us all the Digi-details needed for this post!
Let’s begin with the zones located at the top of the mat and work our way down!
The Memory Gauge zone(s) can be found at the very top of the playmat. The Memory Gauge is a valuable resource that can be spent during play. This zone is shared by both players throughout the course of the game and is a kind of currency system for paying to play certain cards. For example, a card that costs 4 to play, will cost you 4 spaces on the Memory Gauge. And just like a bank account, if you overspend and your memory goes into the negative (or your opponent’s side of the 0) your turn ends automatically.
Next up, we have the Security Pile, which is on the far left side of the mat and directly below the Memory Gauge! You can think of this zone as your life total. According to the rulebook, the Security Pile acts as a defensive barrier that protects you from any/all attacks made by your opponent. Each successful attack made by you or your opponent results in cards from the Security Pile (Security Cards) being removed from it. More attacks mean more cards taken from the Security Pile, and the first player to have all of their Security Cards drained is defeated. However, you must complete one more successful attack on your opponent while they have 0 Security Cards in order to be victorious.
Directly beneath the Security Pile, you will find what’s known as the Raising Area. It’s in this zone where your Digi-Egg Deck and Nursery Area are kept and the Nursery Phase takes place. During the Nursery Phase, you have three options: You can hatch a Digi-Egg, move a Digimon from the Nursery, or you can choose to do nothing. If there are no other Digimon in the Nursery, you can hatch a Digi-Egg. This action consists of you drawing a single card off the top of the Digi-Egg deck and placing it face up in the Nursery Area. Now, only one Digimon can be in the Nursery Area at a time. Any Digimon that achieves level 3 or above can be moved from the Nursery Area into the Battle Area. This is actually a perfect segway into the next zone on our list.
In the middle of the mat lies the Battle Area. This is the zone/field where all Digimon and Tamers are placed, and of course, where all of the action happens. Any Digimon that are placed here can either be used to attack or block attacks from your opponent. Remember, any Digimon that were moved from the Nursery Area into the Battle Area may NOT be returned to the Nursery Area. So, just keep that in mind when/if you choose to move your Digimon from nursery to battle. They grow up so fast in this game.
The last two zones left are probably the most simple and straightforward of all. The Deck Pile is just simply an area for keeping your deck while you play, and the Trash Pile is...well, you can probably guess, but I’ll just tell you anyway. The Trash Pile is basically your discard area, where dead/spent cards are sent and stored, face up. Pretty self-explanatory, right? I mean, you’ve probably played enough games and read enough of these Zone blogs to know how the Deck and Trash Piles work, but again, it’s my task to highlight and detail what each zone does, no matter how obvious or rudimentary they may seem.
Well, we made it through yet another one! That’s five down and two to go. As always, if you have any questions or wish to learn more about the zones or Digimon as a whole, feel free to leave me a message in the comments section and I’ll get back to you with an answer as soon as I can. Also, you can refer back to the official Digimon rulebook and no doubt find the answer somewhere in there.
I thank you for taking the time to read through this post and hope that you will join me in the next one, which will be either, Final Fantasy or DBS. I haven’t quite decided yet. We’ll see.
Until we meet again,
Vince the Prince


4 Comments
Is it possible to only have the memory gauge as an option?
Please fix the memory gauge having both sets of numbers facing the same player!
Why does the Memory Gauge show both sets of numbers facing the player? All other mats I’ve found feature the left 10 facing the player, and the right 10 facing away so they face the opponent (since it’s THEIR side of the gauge). Will this be corrected? Because it looks funny right now.
Now do Weiss Schwarz